How to Clean Your Keyboard: A Step-by-Step Guide
Keeping your keyboard clean is essential for maintaining its functionality and extending its lifespan. Whether you’re a gamer, a professional, or just an everyday user, dust, dirt, and grime can accumulate over time, affecting both the look and performance of your keyboard. In this guide, we’ll walk you through how to clean your keyboard properly.
Why Clean Your Keyboard?
A dirty keyboard is not only unpleasant to use but can also lead to sticky keys, unresponsive switches, and even damage if dirt gets into the inner components. Regular cleaning helps:
- Improve performance and responsiveness.
- Extend the life of your keyboard.
- Keep your workspace hygienic and fresh.
What You'll Need
Before you start, gather the following items:
- EPOMAKER Keycap-Switch Puller (Only $3.99)
- A soft cloth or microfiber towel
- A small brush or compressed air
- Isopropyl alcohol (70% or higher)
- Cotton swabs
Step 1: Turn Off and Unplug Your Keyboard
The first step in cleaning any electronic device is to disconnect it from its power source. If you’re cleaning a wired keyboard, unplug it. For wireless keyboards, remove the batteries or turn them off to avoid accidental inputs while cleaning.
Step 2: Remove the Keycaps
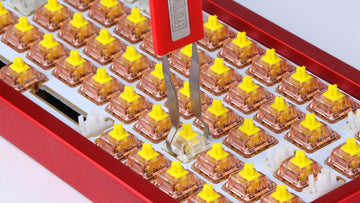
For a thorough clean, remove the keycaps. This will give you access to the dust and dirt that accumulate underneath. The best way to do this is by using a keycap puller. We recommend the EPOMAKER Keycap-Switch Puller, available for just $3.99. This tool allows you to safely and easily remove keycaps without damaging them.
Simply hook the puller under the keycap, and gently lift to remove it. Be sure to keep your keycaps organized to make reassembly easier.
Step 3: Clean the Keyboard Surface
Once the keycaps are off, use a small brush or compressed air to clean out any dust and debris from the keyboard surface. Be thorough, especially around the switches where dirt can build up.
For deeper cleaning, use a cotton swab dipped in isopropyl alcohol to gently wipe around the switches and any other areas that need attention. Avoid getting any liquid inside the keyboard.
Step 4: Clean the Keycaps
While the keyboard is drying, clean the keycaps themselves. You can wipe them down individually with a cloth or, for a more thorough clean, soak them in warm soapy water for about 15 minutes. Afterward, rinse and let them air dry completely before reattaching them.
Step 5: Reassemble Your Keyboard
Once everything is clean and dry, use the EPOMAKER Keycap-Switch Puller again to carefully reattach the keycaps. Press down firmly to ensure each one is securely in place.
Maintenance Tips
To keep your keyboard in top condition, follow these maintenance tips:
- Clean your keyboard every few weeks to prevent buildup.
- Use a keyboard cover to protect against dust and spills.
- Avoid eating near your keyboard to minimize crumbs and debris.
Cleaning your keyboard not only improves its performance but also creates a more pleasant and efficient workspace. With the EPOMAKER Keycap-Switch Puller, you can make the cleaning process quicker and safer, ensuring that your keyboard stays in excellent condition. Visit MechLands today to get yours and explore our full range of keyboard accessories!
Now you should know how to clean your keyboard! By following these simple steps, you'll be able to keep your keyboard in pristine condition for years to come, let's try to clean your keyboard now!

